The WPS button on an Xfinity Router or Access Point is a handy feature. It stands for Wi-Fi Protected Setup, making setting up wireless networks quick and easy. Whether you’re trying to connect one device or many, the WPS button simplifies the process. With just a few clicks of this button, you can easily enjoy the benefits of having a secured network. But how exactly do you use the WPS button?
In this article, we’ll explain exactly what a WPS button is and how it works on Xfinity routers and access points. We’ll look at how to setup a connection using the WPS button and discuss some security tips for protecting your network. Lastly, we’ll take a look at some of the common issues users experience with their WPS connections on Xfinity routers and provide some helpful troubleshooting advice.
Where is the Wi-Fi Protected Setup Button?
The WPS button is used to easily find and connect devices to a secure Wi-Fi network without knowing the password or other credentials. It can be found on most Xfinity routers, allowing you to quickly find the WPS button on your Xfinity router. Generally, the location of the WPS button is near the back of the device. Depending on your model, it may be labeled “WPS“, “Wi-Fi Protected Setup“, or something similar. Some routers may have an LED light next to the WPS button that will blink when pressed. If you are having trouble finding it, consult your router’s user manual for more information about its location. Once you have located it, you can easily begin setting up your device with a secure Wi-Fi network.
WPS on Xfinity wireless gateway
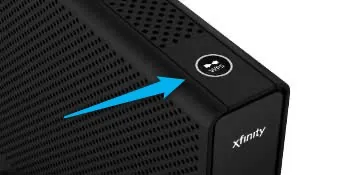
The Xfinity wireless gateway contains an easily identifiable WPS button. It is located on the top of the gateway and is clearly labeled WPS, allowing you to find it quickly and enable the feature. Once you press it, you will notice that the light continues to blink until your other device has successfully connected. When the blinking stops, this means a connection has been established.

WPS on Xfinity xFi gateway 3rd generation
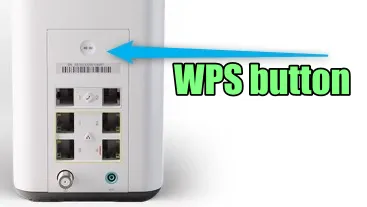
The xFi gateway 3rd generation has a button that can be tricky to find, but it’s the one situated on the back of the router. It will have two arrows facing each other. When we press it, the blue light will begin flashing, and when the device is connected to the gateway, it will turn white.

What Happens When I Press the WPS Button on Xfinity Wifi?
When you press the WPS button on my router, it stands for Wi-Fi Protected Setup, and this is a quick way to connect to a wireless network. It helps connect devices to the router without entering a password. When you press the WPS button, it sends out a signal from the router, and any device within the signal’s range can easily connect to the network. The connection is established almost instantly when you press the WPS button on the router, allowing you to quickly access the internet or other connected devices without manually entering a password or other credentials. This makes connecting faster and simpler from smartphones, tablets, laptops, and other wireless devices.
Wi-Fi Protected Setup Good and Bad
Wi-Fi Protected Setup (WPS) is a network security standard that helps users easily connect devices to their wireless networks without remembering their network name and password. It works by enabling devices with WPS-enabled technology to quickly ‘pair’ with the router with the simple push of a button. This makes it easier for users to add new devices to their network, as they no longer need to manually enter their network name and password whenever they want to connect something.
On the plus side, WPS is an incredibly convenient way of adding new devices to your network, making it very user-friendly. It also lets you keep your current network name and password secure, as you no longer need them when connecting new devices. On the other hand, however, some experts point out that WPS can potentially make your Wi-Fi more vulnerable if someone gains access to the physical button on the router – as this can allow them access into your secured network.
Overall, WPS has both pros and cons associated with it – making it important for users to weigh up both before deciding whether or not they should use it when connecting a device to their network.
WPS PIN configuration
Setting up your WPS PIN is a straightforward process that requires you to follow these steps:
- First, make sure the gateway or router you’re using is WPS-enabled.
- Then locate the Wi-Fi Protected Setup (WPS) button on the device and press it. This should cause the gateway or router to generate a unique WPS PIN.
- After you have obtained this PIN, enter it into your device and select ‘Connect‘ or ‘Apply‘.
- You can now join any network with a Protected Setup without typing in a password.
- Remember that each time you use this connection method, different WPS PINs will be generated by the gateway or router each time.
WPS Button on Xfinity Router is Not Working
If you’re having trouble getting the WPS button on your Xfinity router to work, don’t worry – you’re not alone. The WPS button is located on the router’s rear and allows you to quickly connect your wireless devices to your network without manually entering a password. To activate it, simply press the WPS button on your Xfinity router. Ensure that the WPS feature is enabled in your router’s settings and then press the button again. If it still isn’t working, try restarting both your device and the router. If none of these methods work, contact your internet provider for help or consider resetting or replacing your router.
Conclusion
Now that we are familiar with the functioning of WPS and have learned to set up the PIN connection method, we get a better understanding of the diverse statuses of the Xfinity router. This makes it easier for us to recognize when our devices are connected.
Recommended reading:
Xfinity Router Blinking Green Light Issue: 9 Ways To Fix It Quickly

