In the context of Windows 12 coming soon, Windows 11 still has been a major upgrade for the Windows operating system, and it certainly lives up to expectations. One of the most noticeable changes is the new Right Click menu, which offers more options than ever before. For those who prefer the old context menu in Windows, fear not – you can still access your old context menu with just a few clicks. In this article, we’ll explore what’s new in Windows 11’s Right Click menu, and how to access the traditional context menu in Windows 11 if needed.
Why did Microsoft change the right-click context menu on Windows 11?
Microsoft has adjusted the right-click context menu to make it easier and more efficient for users to access commonly used functions. It is designed to provide quick access to frequently used tasks, such as copy and paste, formatting, and printing. The right-click context menu also allows users to quickly launch apps, open files, or perform other specific actions without searching through menus or typing commands. This adjustment makes it easier for users to quickly complete routine tasks without spending time navigating complex menus or typing out commands. Additionally, Microsoft has also included some helpful shortcuts on the right-click context menu which can be used for common tasks like searching the web or opening a folder location.
Revert to classic context menu via File Explorer
Reverting to the classic context menu via File Explorer is an easy way to get back the old right-click menu of Windows 11. If you’re missing the old context menu, then this is exactly what you need.
Step 1: Press the Windows + E shortcut to launch File Explorer.
Step 2: Click the three dots in the upper right corner of the screen to launch the menu. Then select “Options”.
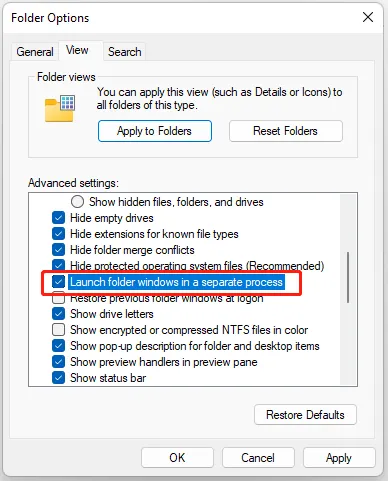
Step 3: Click on the View tab and look at the Advanced settings section.
Step 4: Finally, tick the Launch folder windows in a separate process checkbox. Press the OK button and reboot your PC.
With this change in place, you will now be able to see more options when right-clicking on a file or folder in File Explorer.
Show More Options by Default with Registry Editor
Making changes to the registry can allow users to make changes to how Windows 11 works. One of these changes is the ability to show more options by default with a registry editor. Please follow the below steps:
Step 1: Input “Registry Editor” in the Windows Search bar to launch it.
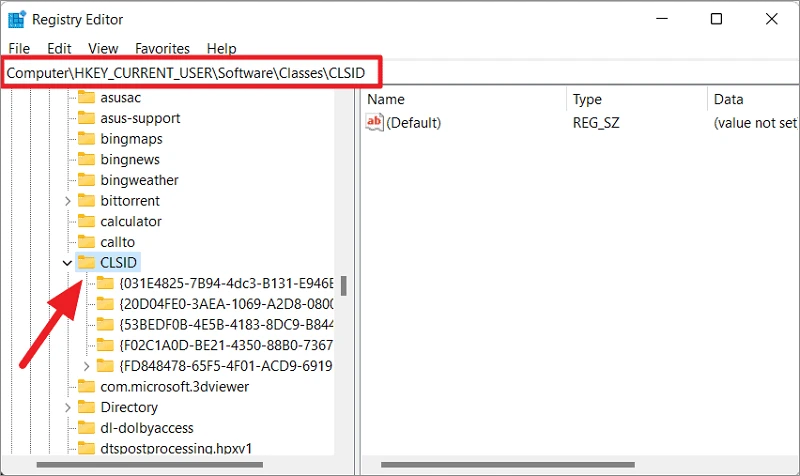
Step 2: Find the “HKEY_CURRENT_USER\SOFTWARE\CLASSES\CLSID” path.
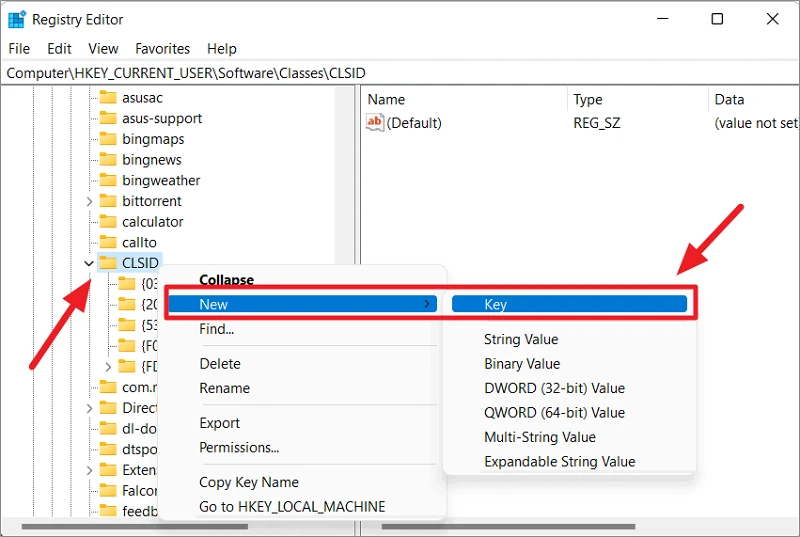
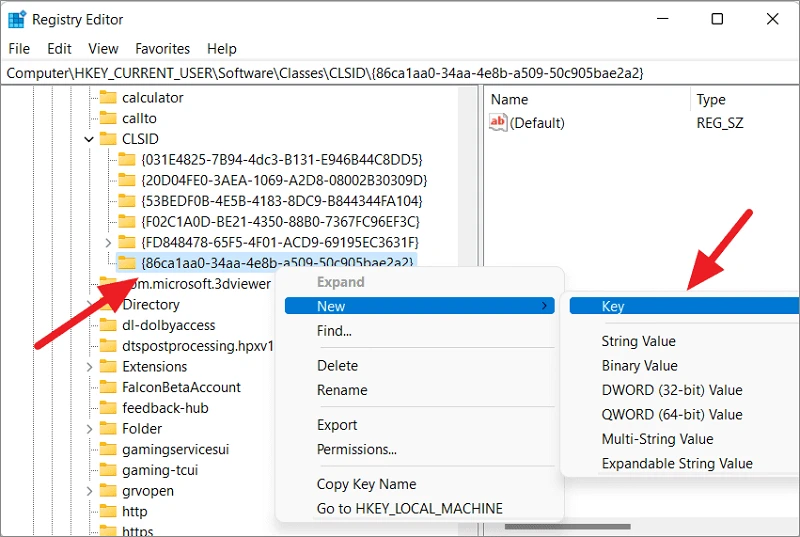
Step 3: Right-click on the CLSID folder, expand the New option and choose Key. Alternatively, right-click on a space in the panel after clicking on the CLSID folder.
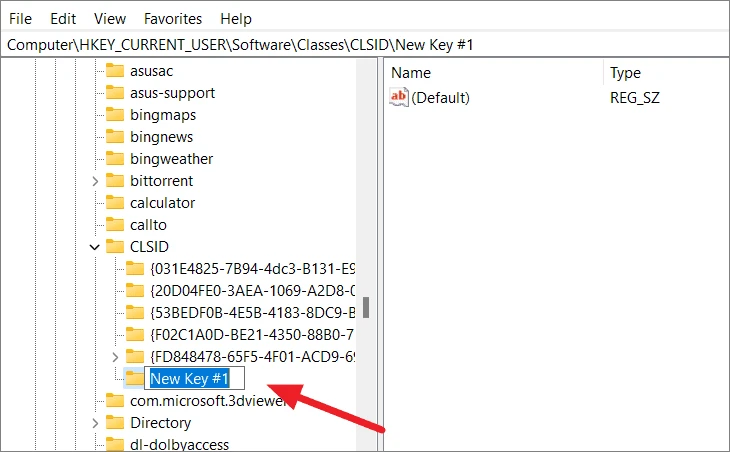
Step 4: A fresh Key folder will be created. Alter the name of the Key folder. Copy and paste from below to avoid any mistakes:
{86ca1aa0-34aa-4e8b-a509-50c905bae2a2}
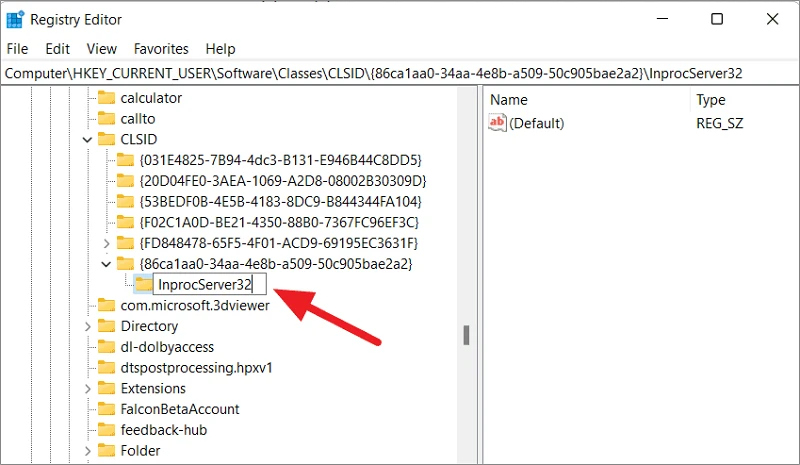
Step 5: Generate a new sub-key by right-clicking the renamed key folder, putting the cursor on New, and selecting Key.
Step 6: Finally, name the sub-key InprocServer32. With the new sub-key, double-click the Default option. Examine the pop-up window and ensure that the Value data is empty. Then, click OK.
After making your changes, save them and restart your computer for them to take effect. With this simple change, you will be able to see more options than ever before when using windows 11.
Note: This operation is a bit complicated and is intended for advanced users only. We recommend using other methods.
Disable the ‘Show More Options’ context menu using Command Prompt
The ‘Show More Options’ context menu can be disabled via the Command Prompt in Windows 11.
Step 1: Type cmd in the Search box and choose the first result. Then, click Run as administrator.
Step 2: Put the following command and press Enter:
reg add HKCU\Software\Classes\CLSID\{86ca1aa0-34aa-4e8b-a509-50c905bae2a2}\InprocServer32 /ve /d "" /f
This command modifies your system’s registry to disable the context menu on Windows 11.
Step 3: Reboot your computer. This will restore the old context menu on Windows 11 and it will appear in the Start Menu.
Revert back to the Old Classic Context Menu using Third-Party app
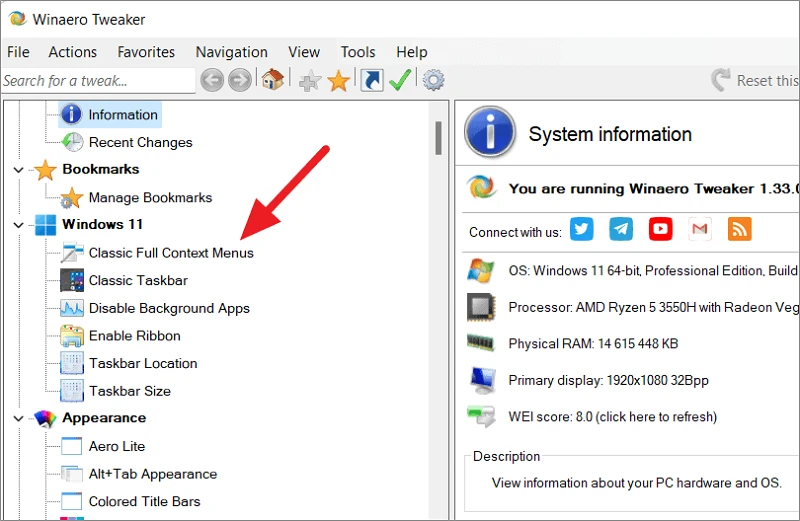
We can use third-party apps to bring back the old context menu in Windows 11. Winaero Tweaker is a free software designed for customizing and tweaking Windows settings, allowing you to modify options that are not available through the user interface. It is secure to utilize and doesn’t contain ads, scripts, or web tracking. To revert back to the old context menu in Windows 11, here’s what you should do:
First, go to the official website and download the Winaero Tweaker for free. Once the download is finished, extract the ZIP file and run the EXE file in order to install the app.
Once the installation is done, open the Winaero Tweaker app. Go to the ‘Windows 11’ section in the left menu and click on the ‘Classic Full Context Menus’ option.
Finally, tick the box for ‘Enable classic full context menus‘ on the right side.
After you have accomplished that, a ‘Restart Explorer’ option will appear at the bottom. Click on it to reboot the file explorer.
Conclusion
This post contains all the necessary steps to disable Show More Options on Windows 11. I trust you find it of use.