If you are a Chromebook user, you may have encountered the DHCP Lookup Failed Error at some point in time. This error message can be frustrating and prevent you from accessing the internet on your device. In this article, we will provide you with a troubleshooting guide on how to fix the DHCP Lookup Failed Error on your Chromebook.
What is the DHCP Lookup Failed Error in Chromebook?
What Causes the DHCP Lookup Failed Error?
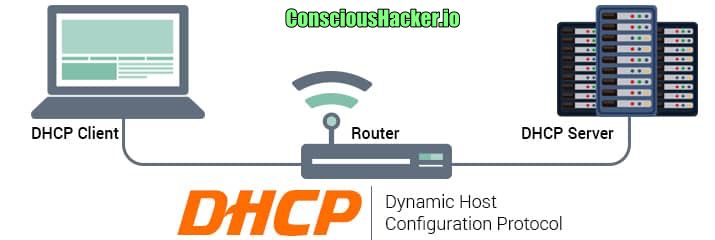
The DHCP Lookup Failed Error occurs when your Chromebook is unable to obtain an IP address from the DHCP server. DHCP stands for Dynamic Host Configuration Protocol, and it is responsible for assigning IP addresses to devices on a network. When your Chromebook fails to obtain an IP address, it cannot connect to the internet.
How Does the DHCP Lookup Failed Error Affect the Chromebook?
The DHCP Error prevents your Chromebook from connecting to the internet. This can be frustrating and limit your ability to use your device. You may not be able to access websites, send emails or download files.
How Can I Tell if a DHCP Lookup Failed Error Has Occurred?
If you encounter the DHCP Lookup Error, a message will appear on your screen indicating that your Chromebook was unable to obtain an IP address from DNS server. You may also notice that you cannot connect to the network or access the internet.
How to Fix DHCP Lookup Failed In Chromebook?
There are various methods you can use to solve the DHCP lookup error on your Chromebook. Some of the common methods are discussed below:
Restart Your Chromebook
One of the simplest ways to fix the DHCP Lookup Failed Error is to restart your Chromebook. This method can clear any temporary data and solve the issue. Hold the power button to restart your Chromebook until the device turns off. Wait for a few seconds before turning it back on.
Check Your Wi-Fi Connection
Another common cause of the DHCP Lookup Failed Error is a weak or unstable Wi-Fi connection. Ensure you are within range of the Wi-Fi router and the signal is strong. You can also try to connect to a different Wi-Fi network to see if the issue is specific to your current network.
Check Your DHCP Settings
The DHCP settings on your Chromebook may be misconfigured, leading to the DHCP Lookup Failed Error. To check your DHCP settings, follow these steps:
Configuring DHCP Settings in Chrome OS
Step-by-Step Guide: How to Configure DHCP Settings in Chrome OS operating system
- Click on the status area in the bottom right corner of the screen.
- Click on the Wi-Fi icon and select your network.
- Click on the Gear icon next to your network.
- Scroll down and click on the IP Settings drop-down menu.
- Select DHCP and save the settings.
Once you have saved the new settings, try to connect to the network again and check if the DHCP Lookup Issue Error has been resolved.
How to Fix the DHCP Lookup Failed Chromebook by Extending the DHCP Range?
If a large number of devices are connected to your network, it is possible that the DHCP range is not large enough to accommodate all of them. To fix the issue, you can extend the DHCP range on your router. Consult your router’s user manual for instructions on how to do this.
How to Access the Internet After Fixing the DHCP Lookup Failed Issue?
After you have fixed the DHCP Failed error on your Chromebook, you should be able to re-access the internet. Try to connect to the network and access websites, send emails or download files to confirm that the issue has been resolved.
How to Fix DHCP Lookup Failed Error by Using the Command Prompt?
If the above methods do not work, you can try to fix the DHCP Lookup Failed Error by using the Command Prompt. The Command Prompt is a built-in tool in the Chrome OS that allows you to execute commands and troubleshoot issues. Here are some commands you can try:
How to Reset IP Configuration Using Command?
To reset the IP configuration, follow these steps:
- Press Ctrl + Alt + T to open the Terminal.
- Type ‘sudo -i’ and press Enter.
- Type ‘sudo dhclient -r’ and press Enter.
- Type ‘sudo dhclient’ and press Enter.
- Close the Terminal and try to connect to the network again.
How to Release and Renew IP Address Using Command Prompt?
To release and renew the IP address, follow these steps:
- Open the Terminal by pressing Ctrl + Alt + T.
- Type ‘sudo -i’ and press Enter.
- Type ‘ipconfig /release’ and press Enter.
- Type ‘ipconfig /renew’ and press Enter.
- Exit the Terminal and try to connect to the network again.
How to Configure the Router’s DHCP Server Using Command Prompt?
You can also configure the router’s DHCP server using the Command Prompt. This can be useful if the DHCP range needs to be extended or if there are other issues with the DHCP settings. Consult your router’s user manual for instructions on how to do this.
Conclusion
Common Mistakes to Avoid When Troubleshooting DHCP Lookup Failed Error on Chromebook
When troubleshooting the DHCP Lookup Failed Error on your Chromebook, avoid the following mistakes:
- Not restarting your Chromebook
- Not checking your Wi-Fi connection
- Not configuring the DHCP settings correctly
- Not consulting the router’s user manual
Final Thoughts on DHCP Lookup Failed On Chromebook Error
The DHCP Lookup Failed Error can be frustrating, but it can be resolved by following the steps outlined in this article. If you are still experiencing issues after trying these methods, contact your Chromebook manufacturer or internet service provider for further assistance.